Issues addressed in the material:
- When you need to replace the drive belt on the Honda CR-V
- Sequential belt replacement on the Honda CR-V
- Replacing the belt in the timing “Honda CR-V”
- Experienced motorists on replacing the belt on the Honda CR-V
In the car “Honda CR-V” four drive belts are installed: on the hydraulic booster, on the air conditioner, on the generator and on the timing. And therefore, replacing the Honda C-RV belt usually involves the diagnosis and further work on at least the first three nodes. The wear of the drive belt is evidenced by a characteristic creak (and sometimes whistling) when starting the car “on a cold”.
Belts are replaced in a certain sequence: first power steering, then air conditioning, and last but not least, a generator. How to do this correctly and what tools you will need to facilitate access to all nodes, we will describe in this article.
When you need to replace the drive belt on the Honda CR-V

Over time, it may be necessary to replace the Honda CR-V belt due to heavy wear on the part. Every motorist should know the symptoms of this problem. Next, we analyze the most common signs of wear.
When you start the car with a cold engine, the belt drive starts to creak. The reason for the extraneous sound is that the part is worn out or the tension of the generator belt should be increased.
If a squeak occurs while the air conditioner is on, check that the belt drive is not worn out; you may need to tighten the air conditioner belt.
The replacement of the alternator belt on the Honda CR-V will have to be done if the following symptoms appear:
- on the dashboard, the battery discharge indicator lights up;
- on the belt drive there are cord detachments, oil smudges, antifreeze spots.
Experts recommend replacing this part on the Honda CR-V at least every two years. In this case, the tension should be checked annually.
However, even in the case when no creaking is heard, a belt replacement on the Honda CR-V may be required due to the fact that the resource of this part has ended. If the belt drive is unusable, and the driver did not pay attention to it, the consequences can be much more serious. In this case, you will spend a lot more on car repair than on buying a new part and paying for the work of the replacement wizard.
It is recommended to check the condition of the belt drive on the Honda CR-V in the second maintenance. Depending on wear, replace the part. Usually this procedure is carried out every 90,000 kilometers.
For Honda CR-V 3 2.4:
- Honda belt drive, part number 38920-RBB-E03.
- Tensioner pulley, part number31180-PNA-J01.
- Tensioner, part number 31170-PNA-023.
For Honda CR-V 3 2.0:
- Belt drive, part number 31110-RWK-004.
- Bypass roller, part number 31190-RNA-003.
- Tensioner, part number 31170-RZP-G01.
Those motorists who previously replaced this part with the Honda CR-V noticed that it was rather difficult to do. In the engine compartment from the side of the pulleys there are few holes the size of which will allow you to stick your hand in. Some drivers make a special puller from a ring wrench and a head for 14.
Also, a special tool can be purchased in the car shop, with it you can loosen the tension. For example, Meisterwerk SR-150B is suitable – this is a kit designed to remove all kinds of pulleys. Using it, you can do the replacement of the Honda CR-V belt with your own hands, this procedure will take you 20 minutes, and no one will need any help.
Sequential belt replacement in the Honda CR-V
The drive of the additional unit in the car is carried out using belts. Since they are arranged sequentially to make the replacement of the air conditioning compressor drive belt on the Honda CR-V, it will be necessary to remove the belt drive of the power steering pump in advance. To replace the Honda CR-V alternator belt, remove all belts.
This means that it is most logical to replace these parts with a kit. Of course, if necessary, the replacement can be performed separately. If you plan to re-install the part, you must put the direction of rotation risks on the belt drive. Otherwise, during installation, you will not be able to install the parts in the correct position.
When the belt drive of the air conditioning compressor drive on the Honda CR-V 1995-2001 is dismantled, check the condition of the tension pulley. If necessary, it must be replaced.
How to dismantle the belt drive on the Honda CR-V when replacing it:
- Using a jack, lift the front left side of the machine, then dismantle the front left wheel.
- Next, you need to remove the lower left engine mount on the Honda CR-V 1995-2001 model year.
- After this, it is necessary to loosen the tension of the belt drive of the hydraulic booster pump.
- Then you need to remove it from the pulleys of the pump and crankshaft.
- After that, loosen the tension of the belt drive of the air conditioning compressor.
- Now you can dismantle it from the pulleys of the compressor, crankshaft and idler pulley. Pay attention to the condition of the roller bearing. It should spin easily, the play is small, there are no extraneous noises. To replace the roller with a 12 mm socket wrench, unscrew the tensioner axis. After that, the roller bracket is clamped in the clamps using an 8 Allen key, the roller fixing bolt is unscrewed. Replace the part. Before tightening the bolt holding the roller, an anaerobic thread lock should be applied to its threaded portion.
- It is necessary to weaken the tension of the belt drive of the generator on the “Honda CR-V” “1995-2001 model years.
- Next, put it on its pulley, and then on the crankshaft pulley.
- Then the tension should be adjusted.
- After that, it is necessary to put the belt drive of the Honda CR-V hydraulic booster pump from 1995-2001 on its pulley, and then on the crankshaft pulley.
- Next, adjust the tension.
- Then you need to put the belt drive of the air conditioning compressor on its pulley, and then on the crankshaft pulley.
- The last step is to adjust the tension.
For greater clarity, we recommend that you study the video, which shows the replacement Honda CR-V belt
Timing Belt Replacement at Honda CR-V
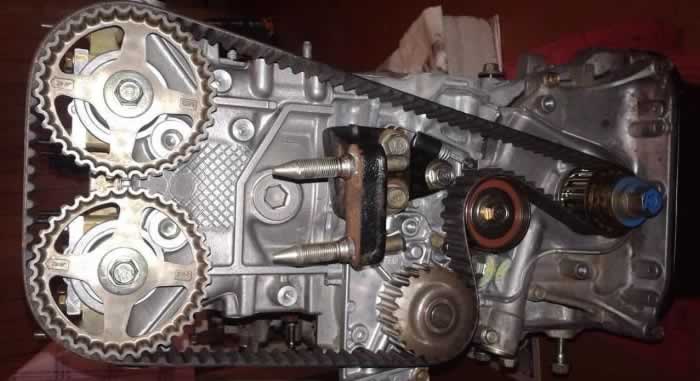
Next, we will analyze how the timing belt is replaced on the “sideboard”. To perform a replacement, position the vehicle on a flyover or above a viewing hole. For this procedure, an assistant will be required.
This manual is suitable if you have a Honda CR-V 1995-2001 model year.
Stage 1. Removal
- First of all, you need to dismantle the upper left engine mount.
- Then remove the belt drives of the auxiliary units.
- After turning the crankshaft to the TDC position of the compression stroke of the 1st cylinder. If you have a car with an automatic transmission, take the spanner wrench at 17, unscrew the bolt that is screwed into the gearbox housing. Using a 10 spanner wrench, unscrew the 3 bolts that secure the automatic transmission cover. If your car with a manual gearbox needs a 17 spanner wrench to remove the clutch housing cover, use it to unscrew two bolts 2 and two bolts 1 with a 10 key.
- Next, you need to dismantle the cover.
- Using the mounting blade, you must hold the flywheel so that it does not rotate, hold it by the teeth of the crown. Using a socket wrench on 19, turn off a bolt of fastening of a pulley of the crankshaft.
- Remove the bolt and washer.
- Swing the crankshaft pulley left and right, so you can easily remove it. Can’t dismantle the pulley? Then press it with mounting blades.
- Remove the key from the slot so as not to lose the part.
- Remove the cylinder head cover.
- Using a socket wrench of 10, unscrew the 2 bolts securing the top cover of the timing belt drive.
- Next, you need to get the bolts from the holes.
- After dismantling the top cover.
- Then, using a socket wrench by 10, unscrew the 4 bolts securing the lower cover of the timing belt drive.
- Remove the bottom cover.
- Remove the outer belt drive guide from the crankshaft.
- Check that the risk on the toothed pulley of the crankshaft is opposite the risks that are on the cylinder block cover.
- Using a socket wrench at 14, loosen the tension bolt securing bolt.
- Remove the tension roller spring.
- Remove the timing belt drive.
- To check in what condition the tension roller bearing is, you need to unscrew the bolt of its fastening, and then remove the roller and tensioner.
Stage 2. Checking the status of the roller
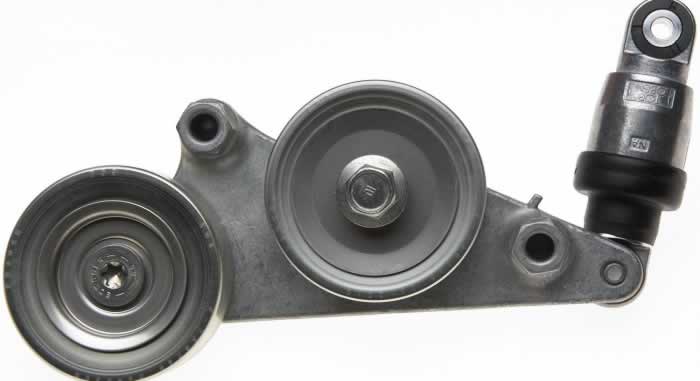
- If the roller is working, it will rotate easily. There should be no jamming, play should not be noticeable to the touch.
- If the video has become unusable, you should replace it with a Honda CR-V. If you are replacing a timing belt on a Honda CR-V, by all the rules of maintenance it is necessary to replace the tension roller, and it does not matter what condition it is in. When the part is removed, make sure that the coolant pump is in good condition. How to do it:
- Rotate the gear pulley of the antifreeze pump, see what condition the pump bearing is in. Pay attention that the pulley rotates easily, it should not jam, the play should not be noticeable to the touch.
- Inspect the details, there should be no drips of antifreeze.
If you find leaks, then the oil seal is worn. In this case, you will have to replace the pump. Have you noticed a leak from under the pump housing? So you should replace the seal.
Stage 3. Installation
- First of all, you need to put the tensioner bracket on the stud, fix the roller with a bolt, you do not need to tighten it completely.
- Next, put the spring on the roller tensioner.
- Then you need to put the timing belt on the camshaft pulleys, as well as on the toothed pulley of the crankshaft. In this case, the front branch of the part should be pulled. Having overcome the resistance of the spring, it is necessary to bring the rear branch of the part to the tension roller.
- After that, you should check whether the marks on the toothed pulley of the crankshaft coincided, as well as the marks on the camshaft pulleys. If necessary, rearrange the belt; to do this, rotate the incorrectly installed shaft pulley relative to it by the required number of teeth. To easily rotate the crankshaft, put the auxiliary drive pulley on it.
- Next, you need to tighten the tension bolt securing bolt with the desired force equal to 54 N * m.
- The final step is to reassemble the parts in the reverse order.
Do not postpone replacing the belt on the Honda CR-V. Otherwise, it can lead to a complete failure of the car while driving. In such a situation, to restore the vehicle, you have to spend a large amount.
To prevent this from happening, timely carry out the car maintenance on time, established by the automaker. The resource of parts is affected by both the quality of the fuel used and the driving style of the car. If you drive sloppy and aggressively, replacing the Honda CR-V belt will be required much earlier than indicated in the instruction manual.

To make the car safe, you should properly care for the car and adhere to the recommendations of specialists.
Experienced motorists on replacing the belt on the Honda CR-V
1. If the belt of the Honda CR-V air conditioner is covered on the road …
“Many drivers are interested in how to replace the belt on the second-generation Honda CR-V if the air conditioner breaks down. What will I advise in this case: always keep a spare part 7РК 1400 in the car, you can purchase it in a specialized car shop. You will also need a key for 14, with it you will be able to replace the belt on the Honda CR-V with your own hands.
In this car, the air conditioning pump is located at the bottom, respectively, water gets on it, it quickly gets dirty. As a result, the bearing quickly becomes unusable, it simply seizes up. I will not envy the driver who will encounter such a problem on the highway. ”
2. When do I need to change the belt of the Honda CR-V air conditioner ?
“I asked many drivers when to do a belt replacement on the Honda CR-V?” What symptoms should I look for? Many advise a visual inspection: cracks on the outside, on the tracks, whether the part is not broken up. A functioning belt drive will also whistle (if it is wet outside and the air conditioner is working). But extraneous sounds must go away quickly. After all, the tensioner will adjust the tension.
And when do you need to replace the Honda CR-V alternator belt? It is recommended that this procedure be performed after 120,000 kilometers with the tensioner and rollers. ”
3. How to determine the wear of the air conditioning belt on the Honda CR-V
“The replacement of the belt on the Honda CR-V needs to be done after 45,000 kilometers, you will immediately realize that it is worn out. Pay attention to two labels: one is larger, the other is smaller. If the part is new, not stretched, then the mark will be large in the area, and if the belt is stretched, in the small area. The auto mechanic says the belts last a long time after replacement. ”
“There is one life hack, with its help you can easily replace the belt on the Honda CR-V.” Mark the position on the old part, then transfer them to the new one. So you will be completely sure that the gas distribution phases are set correctly. ”
5. How to squeeze the tension roller to remove the Honda CR-V belt
“There is one rule: when replacing the belt on the Honda CR-V, the roller also needs to be changed, because if you leave the old part, a whistle will appear. Unlimited budget? Go to a car service, the wizard will do everything for you.
Want to do the replacement yourself? Here is the instruction:
- First we make a key, you will need a cap by 14, it needs to be extended to 35–40 cm. There is also a combination key on sale, just cut the horn, insert it into the pipe of the desired diameter. Now you only need to rivet a sledgehammer.
- We dismantle the right front wheel, the lower protective apron, the tank with the power steering fluid must be taken forward, it should not interfere, because the space is already limited.
- We put the key on the roller mounting bolt, the key should stick down, the tensioner should be pressed out from under the wheel arch, for this we move the key back along the direction of the machine.
- We remove the belt.
- Using the same key, unscrew the bolt securing the roller, do it from above. When unscrewing the bolt, pay attention to the nut, it should not fall into the motor, so work carefully.
When you put a new roller, apply a special sealant to the thread, in Japan this is a mandatory procedure. Tighten with a force of 5 kg. After that, put on a new belt in the reverse order. To make it easier, unscrew the candles. To do this, squeeze the tensioner and secure the key. After that, you can put on the crankshaft rotation belt. Putting on is the only way. By the way, once again check the location of the parts, if necessary, adjust the belt on the pulleys. Then release the tensioner, remove the key and refer to the tensioner marks. The replacement is over. ”